Monday, 3 December 2012

Giant Paper Pom Poms

Tools and Materials

Tissue paper
24-gauge white cloth-covered floral wire
Scissors

Hanging Pom-Poms How-To

1. Stack eight 20-by-30-inch sheets of tissue.
2. Make 1 1/2-inchwide accordion folds, creasing with each fold.
3. Fold an 18-inch piece of floral wire in half, and slip over center of folded tissue; twist.
4. With scissors, trim ends of tissue into rounded or pointy shapes.
5. Separate layers, pulling away from center one at a time.
6. Tie a length of monofilament to floral wire for hanging.

Saturday, 1 December 2012

Pumpkin: Tis the Season ...Part 3

Pumpkin Soup

This recipe is from BBC Good Food

Ingredients

  • 4 tbsp olive oil
  • 2 onions , finely chopped
  • 1kg pumpkins or squash (try kabocha), peeled, deseeded and chopped into chunks
  • 700ml vegetable stock or chicken stock
  • 142ml pot double cream
  • 4 slices wholemeal seeded bread (if like me you don'e like croutons in your soup skip the bread)
  • handful pumpkin seed from a packet
Prepartion

  1. Heat 2 tbsp olive oil in a large saucepan, then gently cook 2 finely chopped onions for 5 mins, until soft but not coloured. Add 1kg peeled, deseeded and chopped pumpkin or squash to the pan, then carry on cooking for 8-10 mins, stirring occasionally until it starts to soften and turn golden.
  2. Pour 700ml vegetable stock into the pan, then season with salt and pepper. Bring to the boil, then simmer for 10 mins until the squash is very soft. Pour the 142ml pot of double cream into the pan, bring back to the boil, then purée with a hand blender. For an extra-velvety consistency you can now push the soup through a fine sieve into another pan. The soup can now be frozen for up to 2 months.
  3. While the soup is cooking, slice the crusts from 4 slices of wholemeal seed bread, then cut the bread into small croutons. Heat the remaining 2 tbsp olive oil in a frying pan, then fry the bread until it starts to become crisp. Add a handful of pumpkin seeds to the pan, then cook for a few mins more until they are toasted. These can be made a day ahead and stored in an airtight container. Reheat the soup if needed, taste for seasoning, then serve scattered with croutons and seeds and drizzled with more olive oil, if you want.
 

Thursday, 29 November 2012

Pumpkin: Tis the Season... Part 2

Salted Pumpkin Seeds

Ingredients

Serves: 4
  • 150g (5 oz) pumpkin or squash seeds
  • 1 tablespoon olive oil
  • 1/2 teaspoon salt, or to taste

Preparation method

Prep: 10 mins | Cook: 15 mins

Tuesday, 27 November 2012

Pumpkin: Tis the Season for.. Part 1

This is a recipe that I reccently tried with a friend who was suffering with a serious case of Massive Pumpkin Syndrom, MPS if not dealt with quickly can result in Pumpkin rot which is equally distressing.

Pumpkin Pie


The recipe that we used is from the BBC's Saturday Kitchen and the chef was Antony Worrall Thompson who is one of my favourite chefs.

Please note that we proudly used a shop bought sweet short crust pastry case.

Ingredients

For the pastry
  • sweet short crust pastry case (or a packet of ready made sweet short crust pastry with 40g/1½oz crushed pecans mixed in.)
For the filling
  • 450 g/1lb prepared weight pumpkin flesh, cut into 1in/2.5 cm chunks
  • 2 large eggs plus 1 yolk (use the white for another dish)
  • 3 oz/75g soft dark brown sugar
  • 1 tsp ground cinnamon
  • ½ level teaspoon freshly grated nutmeg
  • ½ tsp ground allspice
  • ½ tsp ground cloves
  • ½ tsp ground ginger
  • 10 fl oz/275 ml double cream

Preparation method

  1. Pre-heat the oven to 180C/350F/Gas 4.
  2. Use a shop bought sweet crust pastry case, about 9 inch/23 cm diameter and 1½ inches/4 cm deep.
  3. To make the filling, steam the pumpkin then place in a coarse sieve and press lightly to extract any excess water.
  4. Then lightly whisk the eggs and extra yolk together in a large bowl.
  5. Place the sugar, spices and the cream in a pan, bring to simmering point, giving it a whisk to mix everything together. Then pour it over the eggs and whisk it again briefly. (Your kitchen will start to smell so good that you may be temped to lick the spoon, I was).
  6. Now add the pumpkin pureé, still whisking to combine everything thoroughly.

    Top Tip: If you puree is not that smooth it will make everything lumpy so throw everything into a blender or use a hand blender to solve that problem.

  7. Pour the filling into your pastry case and bake for 35-40 minutes, by which time it will puff up round the edges but still feel slightly wobbly in the centre.
  8. Remove the pie from the oven and place the tin on a wire cooling rack. Serve chilled (stored loosely covered in foil in the fridge) with some equally chilled créme fraïche, but warm or at room temperature would be fine.

Monday, 26 November 2012

By way of a blogging apology!

To all of you who have noticed a lack of weekly blog posts in the last few weeks, from tommorrow onwards I will be attempting to catch up and posting either a craft or recipe every other day.

TTFN,

MagpieSpirit

Tuesday, 9 October 2012

How slow is Sloe Gin really?

Last year, I was not organised enough to make my own Sloe Gin, not so this year! On Sunday, I went to the Alexandra Palace's Farmer's Market, I know it's a cheat to buy them. But to be honest I'm a city girl and only really comfortable foraging blackberries and the like. Maybe next year.


Making sloe gin is pretty quick to start and slow to finish but not laborious, think of the turtoise and the hare and you're on the right track. There's no cooking required, just patience as the sloes steep in the gin.

You will need:

-450g/1lb sloes
-225g/8oz caster sugar
-1 litre/1¾ pint gin
- A large sterilised jar or bottle
- A sterilised needle
- A funnel
- Measuring Scales

Preparation method:

-Prick the tough skin of the sloes all over with a clean needle and put in a large sterilised jar. (My advice use something that can hold atleast 2ltr with a wide neck, I didn't and may pay for that later. I used a 1 1/2ltr bottle and could only get half of the gin in the bottle so I will have to leave it alone for that first week, then transfer the whole mixture to something bigger).
-Pour the sugar in through the funnel and use the gin to wash it through the funnel spout, seal tightly and shake well.
-Store in a cool, dark cupboard and shake every other day for a week. Then shake once a week for at least two months.
-Strain the sloe gin through muslin into a sterilised bottle.

 I will be trying to update this post with photos after each shake.

 Top recipe tip to try as well:

You can make blackberry brandy in the same way, substituting blackberries for the sloes and brandy for the gin. Blackberries do not need pricking. If I have time in the next couple of weeks, I will try this tip.

TTFN

 MagpieSpirit

Tuesday, 2 October 2012

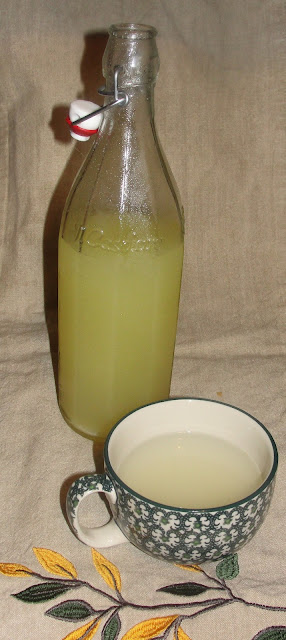
Ooh it's getting cold outside...time for some home-made ginger cordial

As the weather starts to cool, the skies seem more grey than blue, we all know that our first winter cold is about to make itself known. My home-made ginger cordial isn't a cure all but will warm you from your core and only takes about 30 minutes to make.

Try it and let me know what you think.

Ingredients :~ Makes 350ml approx but this recipes doubles easier
  • Rind of 1 unwaxed lemon
  • 150g golden caster sugar
  • 240ml water
  • 3 inch (generous chunk) piece of ginger peeled and chopped finely (or cheat and throw in the blender with the water)
  • 2tsp cream of tartar
  • 50ml fresh lemon juice

    Step 1. Peel the rind off the unwaxed lemon making sure you remove any of the white pith and put in a heavy based saucepan.

    Step 2. Add the water, ginger, cream of tartar and the sugar last.

    Step 3. Turn up the heat to bring to the boil and stir until the sugar has dissolved.

    Step 4. Take off the heat and add the lemon juice.

    Step 5. Bring back to the boil then strain the mixture through a fine sieve or muslin into a bowl and set aside to cool.

    Step 6. When cool, pour into a sterilised bottle jar (I used a bottle that originally contained olive oil).

    Keep refrigerated and use within 2 weeks .

    I got this recipe from how to cook good food.

    Enjoy,

    TTFN

    MagpieSpirit

Tuesday, 25 September 2012

Food Glorious Food

I would really like to  take full credit for this beautiful spread but I wasn't the cook but one of those invited to taste test . With that said I did remember to get the recipes...once I actually asked for them.


Herby Tomatoe Salad
6 tomatoes 
1 medium red onion
Dressing
Big hand full or parsley and coriander minced.
2 cloves of garlic minced, 
Good glug Balsamic viniger
Good glug of Olive oil

Squash Salad
1 butternut squash , peeled and cut into long pieces
1 tbsp olive oil
250g pearl barley
300g Tenderstem broccoli , cut into medium-size pieces
100g SunBlush tomatoes, sliced
1 small red onion, diced
2 tbsp pumpkin seeds
1 tbsp small capers, rinsed
15 black olives, pitted
20g pack basil, chopped
Dressing 
5 tbsp balsamic vinegar 
6 tbsp extra-virgin olive oil
1 tbsp Dijon mustard
1 garlic clove , finely chopped

Pepper Parcels
½ red onion, peeled and cut into wedges
4 baby courgettes, halved and sliced
16 small cherry tomatoes
16 small black olives
200g feta cheese
2 tbsp shredded basil
olive oil
4 red peppers , halved, seeds removed

Grilled Portobello
2 tbsp Dijon mustard
1 tbsp balsamic vinegar
2 large portobello mushrooms
2 thick slices beefsteak tomato
2 ciabatta rolls, toasted
2 slices red onion
2 handfuls rocket

Cougette Salad
2 large courgettes
3 tbsp olive oil
1 tbsp lemon or lime juice
1 tbsp clear honey
2 tsp poppy seeds
1 small garlic clove , crushed
salt and pepper , to taste

In my own opinion, I have left the best to last
Schug
1 pound of peppers (you can mix it up, but go red or go green for bright, consistent color)
1 head fresh garlic, peeled
1 1/2 tablespoons cumin
Black pepper and sea salt to taste
Olive oil to cover

Hope you like them. Let me know what you think.

TTFN

MagpieSpirit

Tuesday, 18 September 2012

New Lampshade from Cath Kidston

Apologies for that late post but Cath Kidston is to blame or rather the fabulous Cath Kidston lampshade workshop that they held this evening.

The whole event was well worth the 20 minute wait on hold the day of the ticket release back at the start of this month and the cost of the ticket.

I went to the Marylebone store with my crafter-in-crime partner, you've seen her hands and kitchen in the soap making post.


Our tutor this evening was the amazing Georgie of Sew Over It.

I would type out all the instructions but a quick internet search looking for lampshade making kits found kits that come with paper instructions inside. If you need additional help search youtube for "Lampshade Making".

p.s. if this is truely your first time making your own lampshade, I would suggest inviting a friend around for abit of a craft evening and you both making lampshades. You will be so greatful for the extra hands!!

TTFN

MagpieSpirit

Tuesday, 11 September 2012

Dry Wipe Board

This is so easy to do that you can be done in less than ten minutes.

You will need:

-A picture frame (any shape or size you wish)
- A remnant of fabric, wallpaper or wrapping paper.
-Dry wipe marker with sponge lid


Put desired paper inside the frame, close frame and you are done. Now you can write and wipe the surface of your dry wipe board to your hearts content.

TTFN

MagpieSpirit

Tuesday, 4 September 2012

Plum Chilli Jam

Here's a great recipe that is good on scones, cheese, meat and toast, an all-round jam.

Ingredients :

  • 1kg red plums
  • 500g Preserving Sugar
  • Juice of 2 Lemons
  • 2 Red chillies - mild kind
  • 25g butter
Step 1. Half and stone the plums.

Step 2. Finely slice the chillies. I recommend de-seeding them at this point. Use a teaspoon to scrape the seeds out. Instead of slicing, I used my kitchen scissors.

Step 3. Cook gently until the plum skins are soft.

Step 4. Mix in the sugar, stirring the pan until it has dissolved.

Step 5. Add the chillies and then bring to the boil and boil until the mixture has reached setting point.

Step 6. Add the butter and stir into the pan.

Step 7. Pot into sterilised jars, seal.

At this point you can label or boil jam in jars which creates a firmer jam, then label.

Can be eaten immediately but I recommend leaving for 2 weeks before consuming. You can leave the jars in the fridge for up to 6 months if left unopened.

TTFN

MagpieSpirit

Tuesday, 28 August 2012

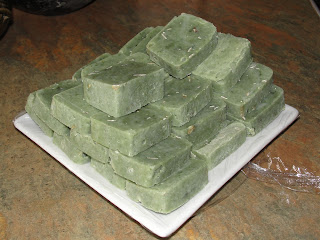
Rosemary Gardener's Soap

Rosemary Gardener's Soap is meant to cleanse and revitalize skin and makes upto 16 bars of soap.


Ingredients:
300ml (1/2 pint) Cheap olive oil
175ml (6 1/2 fl oz) coconut oil
120ml (4 fl oz) cooled, boiled or distilled water
60g (2 oz) caustic soda (lye crystals)
1 tbsp green clay
3 tsp spirulina powder or 4 crushed spirulina tablets
1 tbsp bran, oatmeal or rolled oats
30 drops rosemary essential oil

You will also need some equipment, it's not necessary to purchase a separate set of equipment for soap making, but if you're using cooking equipment, make sure you clean everything extremely well.

-Digital kitchen scale
-Stainless steel / Enamel pot
-2 x plastic spatulas
-Thermometer that register between 38-93 degrees C (100-200 degrees F)
-Spoons / bowls for weighing / measuring
-A good-sized container for mixing the NaOH solution (this should be reserved for you soap-making only).
-Hand blender (optional)
-Plastic or wooden mould
-A little oil and greaseproof paper for lining the mould
-Blanket or large towel
-Rubber gloves
-Apron (safer still to wear old / house clothes under the apron)
-Goggles
-Cloth for cleaning up spills
-Bottle of vinegar

Step 1. Mix the olive and coconut oils in a saucepan with a whisk over a low heat until the temperature reaches 60 oC (140 oF).


To make the lye mix, pour the water into a stainless steel or glass bowl placed in a sink in case the contents froth over when you add the caustic soda. wearing protective goggles, gloves, and an apron, add the soda to the water and mix with a wooden spoon until the crystals have dissolved. Leave to cool.

Step 2. Add the the cooled lye mix to the hot oils in the saucepan and stir with a wooden spoon until well mixed. then beat with a metal whisk until the mixture reaches the consistency of thick custard so that a line is visible if drawn across the surface.


Stir in the green clay, spirulina, bran/oatmeal/rolled oats, ans essential oil.


Step 3. Pour or spoon the mix into your moulds. Cover with a cloth and leave for 24 hours. While still soft remove the soap from your mould wearing plastic gloves, and cut into bars using a knife. Arrange on trays and leave to dry out fully and harden this process is called curing and will take atleast 4 weeks. An alternative to plastic or wooden moulds, try using juice or milk cartons, pour or spoon the mixture into the cartons. Wrap the cartons in a large towel and set somewhere warm for 24 hours like the airing cupboard. The cartons will feel warm and will get hot as the mixture neutralizes and turns into soap.  To unmold your soap, peel off the cartons and cut soap into sections for hand soap. Place each bar on a wire rack in a cool, dark place to cure for 4 weeks. After 4 weeks, soap can be buffed with a cotton cloth and wrapped for gifts.

I'm always looking out for new soap recipes, so if you have any suggestions for lye solution based soaps please send them to me to try.

Tuesday, 21 August 2012

Mug gets a Sharpie Makeover

Today I decided to decorate a latte cup with a Sharpie marker, I have seen it on pinterest and thought that it was a cool, cheap way of jazzy up a bland white cup.


I found several different sources but the info was basically the same - use a Sharpie on a glass/porcelain/ceramic mug with the design of your choice and set it by baking it in the oven for 30-35 minutes at 180oC.

You will need:
A Sharpie marker
A cup or plate
Some design or artistic inspiration - I had to decided to use a stencil
so also needed some tape.


Going freehand and writing a quote would be cool as well.  But as I used a stencil that I had in my craft space, a cut out section from an old lampshade. Guess that not all hoarding is bad.

After picking a design and applying to your mug, follow these steps:

    Preheat your oven to 180oC degrees.
    Stand your mug up on a baking sheet, or something similar.
    Bake your mug for 30 minutes.
    Use an oven mitt to remove and let cool.

The mug looked no different, but I guess this helps the Sharpie stay on. Now it should be safe for the oven and microwave. On methods of washing, opinions are divided as to whether or not your design will make it through a dishwasher cycle, so I have written hand wash only on the bottom.

This could be a great gift idea, craft event idea or favour for a party/wedding/shower. Just buy cheap mugs (would also work on plates) from a pound shop and decorate the way you like.

Tuesday, 14 August 2012

Simple NoteBoard

This simple noteboard is called a Noteboard as I use no cork in the construction so you can't actually pin anything unless you have thumbs of steal.

For this projesct you will need:

Piece of board (any size you want)
Fabric
Wadding
Scissors
Staple gun and extra staples (I'm always running out of Staples)
Ribbon
Ruler or tape measure
Maker Pens

Step One:
Using your ruler or tape measure, measure your board and work out where you are going to place your ribbon. it may seem strange to workout the ribbon placement first but I find it easier to make to board. Make your marks by lining up your ruler to the board and mark on the inside edge (also makes a nice guide line when stapling your fabric and wadding).


Step Two:
Turn your board over and lay your wadding across the top (you want to make sure that you have atleast an inch overlap to staple to the back). Pull wadding round the back and staple making sure that you staple about 1cm from the edge of the board and trim excess wadding with care.

Step Three:
Repeat Step Two with your fabric. Pull wadding round the back and staple making sure that you staple about 1.5 - 2cm from the edge of the board and trim excess fabric with care. Fold the corners in and staple securly.


Step Four:
Staple Ribbon to first mark on the back of the board pull the ribbon forward across the front of the Board, diagonally and round to the back staple to next mark.


Step Five:
Repeat stapling Ribbon across the entire board until you have a series of diagonal stripes.


Step Six:
Staple Ribbon crossways now and if you are using striped ribbon (like I have) try weaving it. It adds to the look.

Step Seven:
Once the entire board is covered with the Criscrossed Ribbon, staple at each and every intersection. You can at this point use a glue gun to attach buttons or the like, I personally don't bother as the board will be covered within weeks and more irritatingly the buttons have a habit of falling off.

I hope this has inspired you, have fun!

TTFN

MagpieSpirit

Tuesday, 7 August 2012

Chair - Re Upholstered

Now you may not believe me but this chair cost less than £5 to do.How? You may be asking, well I found the chair by the bin (someone had actually thrown it out, no fabric ripped, no broken legs), I already owned the staple gun, the staples, the fabric and the wadding.The only thing that I needed to buy were the foam pads for the seat and back.

Despite the length of time this project took to complete it was very worthwhile and I will enjoy all the sitting and crafting I will be doing in this chair.

If you want to copy me and replicate this project you will need:

Chair or stool
Craft Knife
Bread Knife
Staple gun Staple remover (A flat head screwdriver will work but it takes longer)
Staple Gun
Staples (make sure you have plenty)
Scissors
Foam Pads for Seat (and Back if your chair has one)
Wadding
Eye Mask or Goggles
Flat Noses Pliers
Heavy duty gloves- Optional

Step One: Organise Yourself

Put on your Goggles and make sure that you have everything thing you need for the first few steps to hand.

Step two: Remove the old Fabric

Use the craft knife to cut the fabric, do this carefully as you may find that the wadding and pad underneath are reusable, although they still need to be removed. (I didn't take that time as I needed to strip back to the frame as it had been raining and I didn't want the frame to rot, at this point I left my chair skeleton to dry, hopefully you won't have to do this). While you are stripping the chair frame take time to notice how the chair was originally upholstered, take photos if necessary. I will explain why later.


Step three: Get rid of the old staples


Remove all the old staples using the staple remover and the pliers, you should probably be wearing gloves but I found it fiddly enough without wearing gloves. (My main excuse is that I'm a lady with lady sized hands and the Heavy duty gloves I have fall off if I drop my hands to my sides).  If you can't get the staple out and it's close to the surface of the wood use your staple gun and bash it down. You don't want to do this to much as it will make it difficult to staple when your re-upholstering later.
Step Four: Checking the seat

Place the seat pad on the chair and sit on it, the chair will either fill saggy or not. Mine had a little slag so removed the staples from one side of latticed straps and pulled them tighter and re stapled. When I re-checked the seat it felt great.

Step Five: Sizing and securing the seat pad

You can use a paper template made by placing it on the chair skeleton and making out the outline where the seat pad will go. As it is unlikely that the chair will be square like the pads are generally sold, use the bread knife to cut the pad, trying to cut in the downward direction only. (I have never perfected that skill so my edges were a little ragged). Use your staple gun to secure in place with a couple of staples placed just above the base of the pad no more than 1cm.

Step six: Wa Wa Wadding

Cover seat pad with the wadding making sure that the wadding covers over sides of the chair. Staple from the middle of each side, started on the right side, pulled the wadding alittle on the left, stapled, front then back. The repeating again so that all the wadding is secured across the sides evenly. Make hospital corners on the corners by folding in the fabric and ensure that you don't leave unsightly bulges. I cut all the excess wadding away once I was happy.

Step Seven: Repeat this if your chair has a back that you want to cover.

Step Eight:  It's time for the fabric

The idea is the cover the chair so it looks as professional as you can, so this is when those photos you took or the mental notes you made come in handy. Cover with your chosen fabric like with the wadding in Step Six the only difference is that you will stapling your fabric to the underside of your chair frame. Start with a few staples on each side, once you have all four sized secured in the middle, Make your hospital corners. Use your scissors, cutting  against the chair legs so vertically, then cut horizontally  about 1cm below the seat of the chair frame. The aim is the fold up these corners that sit over the legs so that they are the same height as the fabric that is stapled under the chair frame creating a beautiful continuous line. You repeat this to cover the back of the chair.

TTNF
MagpieSpirit

Thursday, 2 August 2012

Is it ever to early the plan for Christmas?

Not if it's going to be a Homemade Christmas and with less than 25 weekends to the best day of the year.

The plan for this year so far are to make soaps, flavoured oils, flavoured vodka, sloe gin, sweet and savory jams as they all require time to mature, to give as gifts. Look out for recipes, links and tutorials as I gear up for the festivities.

TTFN,

MagpieSpirit

Saturday, 28 July 2012

Tuesday, 17 July 2012

Homemade Pore Strips


You know those Biore pore strips you buy at your local high street chemist, about £8, for box of about 6 strips? Today I’m going to teach you how to make your own homemade pore strips courtesy of http://petitelefant.com/how-to-pore-strips/


Ingredients:
•    1 Tablespoon Unflavoured Gelatine
•    1 1/2- 2 Tablespoons Milk (any kind) but I used semi-skimmed which works fine.
From these 2 ingredients, your pores will look like magic.  What’s not to love?


1.    Measure 1 Tablespoon of unflavoured gelatine into a disposable container (if you put say, green jelly on your face, there might be trouble, also use a disposable container, I didn't spent a long time trying to get the glass clean).
2.    Add 1-2 Tablespoons of milk into the gelatine
3.    Until it looks like... well snort
4.    Mix it up, and be quick, until you get a chunky consistency (snort like.  Add more milk if you’re uncomfortable with the amount of chunk.
Microwave the gelatine for about 10-15 seconds.  It will get creamier in the microwave.  Stir that around and start applying it IMMEDIATELY to your nose/face and as evenly as possible.  This stuff hardens up fast so you’ve got to act fast.
Wash your face before you apply.

I chose to put the stuff all over my face because I wanted to.  You can put it wherever your desire, but you need to act fast as this stuff turns to gelatine pronto.

Let it dry for about 15+ minutes.  I waited a lot longer, got distracted by the TV, but you’ll know it’s time when you can’t talk or smile.

Grab whatever you can and start peeling.  This is the gross/fun part.

It’s a good thing you can’t see the photo all that well.  Do this until you’re all peeled and your face will feel like a baby’s bottom, and you won't be able to stop touching it.

Clean, practically hairless, with clean, dirt-free pores.

TTFN

Thursday, 26 April 2012

Rob Ryan Rocks!!

This week, My Wi Group the Shoreditch Sisters had the pleasure of having Rob Ryan as our guest. Rob is well known for his Paper Cutting, and he is an extremely likeable gent. We were even lucky enough to have had him design a paper cut for me and my sisters to try.


I must admit that once we started cutting, I kept sticking my tongue out with concentration. (I knew my that my photo was being taken). 


Although I didn't manage to finish all the cutting on the night, I had finished by the following evening.

This experience has definitely given me some big ideas for Christmas.


Thursday, 19 April 2012

Glass Jar Project - Lavender Bath Soak

Glass Jar Project - Lavender Bath Soak


So I've recently found a fabulous blog called The Spotted Fox, and it gave me idea about what to do with my ever growing collection of glass jars, that I haven't used. Let the Glass Jars Project begin:

Lavender Bath Soak - (thanks for the inspiration Spotted Fox.)

This is relaxing and soothing way to end the day.

What you’ll need:

-1 part Bicarbonate of Soda
-5 parts Epsom Salts
-1 part dried Lavender Flowers
-5-10 drops Lavender Essential Oil

* Mix all ingredients together by pouring into a large container/a zip-lock baggy and shake, shake, SHAKE. I used a zip-lock baggy.

* Store in your chosen jar

* Tie on some pretty yarn around the jar neck and give as a handmade gift to yourself (if your feeling generous give away as a gift), I'm keeping this one so I didn't beau-ti-fi the jar too much

* Add a few spoonfuls to your next bath, if like me you plan to keep it!

Enjoy

Thursday, 12 April 2012

Easter Eggs, Eggs, Eggs

Although we have now got easter firmly in the past, I though I should post my homemade attempts at Easter eggs.

Its incredible that some melted chocolate, spinkles and some ribbon should bring so many smiles on Easter Sunday.

Sunday, 18 March 2012

Mother's Day Pamper Zone

One of the things that my mother had been wanting to do was have a  bit of a pamper in the form of a facial, so that was what she got today. By candlelight and jazz music softely playing in the background.

Step 1 - Remove makeup. (Standard cleansing wipes)
Step 2 - Steam face to open the pores. (Home Facial Steamer - I got mine from Agros) Massage hands and arms with almond oil and creams.
Step 3 - Apply the Sauna Mask. (Standard Mask bought from a high street pharmacy)
Step 4 - Remove the Mask and moisturise skin.

The whole pampering did involve a bit of step up and clean up, but  overall was a storming success in the mother pleasing scales.

Try it next year or if you aren't based in the UK, try it out when it comes up. Dad's might even like it for Father's Day.

DIY Teacup Candle Making

These candles make unique gifts for a Mother's Day, Birthdays or Weddings and can even be used to add that special touch to special ocassions. To make candles in containers you'll need to use special container wax that won't pull away from the sides as it cools. Soy wax is kinder to the environment and it's much easier to clean up, but reusing partially burned candles is also an enviromental option. Any utensils you use can be washed simply with hot soapy water or put in the dishwasher, when you use Soy wax.

What you'll need

* Teacup, pot or jar
* Flaked soy wax (£3.85 for 500g at The Make Lounge) or partially burned candles (if you want to go down the reuse, recycle route)
* Eco wicks (£2.00 for 5 at The Make Lounge)
* Double boiler or two saucepans that fit on top of each other
* Cooking thermometer
* Two pencils/ wooden skewers (to support wicks per Teacup, pot or Jar)
* Fragrance oils (from £1 a bottle) if you want to scent your candle
*Tongs (to pick out the old wicks)

How it's done

1 Pour your flaked wax/partially burned candles into a double boiler or a pan placed on top of another pan of water. You can work out how much wax you'll need by filling the teacup with water and weighing it, but I like trying the game of guessing. Melt the wax, heating to 165°C to 185°C. Add scented oils if using. The ratio of fragrance to wax is eight per cent, but do weigh it as some oils are heavier than others. Mix in the oil using a metal whisk.

2 Place the wick in the centre of the cup. It will come fixed to a metal disc enabling it to stand up. Wicks come in various sizes and the one you need will depend on the width of your container. Most suppliers will have a size guide.

3 Once you've melted the wax, slowly pour it into the teacup, filling it to the top. You should have some wax left over - you'll need this for the second pour. Hold the wick in the centre by placing it between two pencils balanced across the cup.

4 Once the candle is completely cool to the touch (about one hour), do your second pour. Wax shrinks as it cools so a crevice will develop in the centre. Heat the leftover wax to 10°C hotter than the first time and stir again for a couple of minutes. The wax needs to be hotter when you top up the container as this will give you a nice smooth surface once it's cooled.

5 Leave the candle to cool and harden thoroughly and then trim the wick to 1cm before lighting.

TTFN

MagpieSpirit

Monday, 12 March 2012

Jem Made This - Covered Button Broach


I recently joined my local WI  group (Shoreditch Sisters) upon signing up I was given a white sticky label to write my first name on and stick on myself. Easy, so far. While waiting for the proceedings to start a member shouted out asking for safety pin, to our shame, (he he) within a group of  approx. 40 ladies that had gathered so far, not one safety pin available. The member jokingly quipped "Ladies we are the WI", to some laughter. But that got me thinking if we are the WI, my white sticky label needs to be upgraded. You can see the result.

If you want to reproduce this covered button broach, you will need:

An embroidery hoop
some coloured embroidery thread
8" square piece of fabric of your choice
38cm or larger self-covered button blank (ideally the type with a safety pin on the back, otherwise you will need a safety pin)
An embroidery needle (or one that has an eye big enough for the thread to go through)
And little imagination and depending on your design and sewing skills, anything from 20 minutes to 3 hours to sew.

I felt I wanted to add alittle bling, so I also used my glue gun.

Happy sewing.

I would love to see any attempts at this project please email any pictures to jamila@magpiespirit.com.

TTFN

MagpieSpirit

Sunday, 11 March 2012

My Guilty Pleasures... aren't so Guilty

I was recently watching a programme on the box, it was on of those film review bits, where a celebrity is asked about their favourite film choices and then reveals their film guilty pleasure. It got me wondering about  mine.

Lets start with my film pleasures; Dune "And how can this be? For he is the Kwisatz Haderach" and musicals Sister Act, Seven Brides for Seven Brothers, Burlesque etc.

Strawberry flavoured Angel Delight is high on the general pleasures list.

Craft/Design Mags may be more of a growing addiction, especially as they can not be thrown away. Or is that just hoarding?

Sugar Sifters - growing collection?? Or more hoarding?

As I write this, I realise that my guilty pleasures aren't so guilty... so with that said I will continue my list of pleasures.

Jam making, preserving and pickling is all part of my attempt at becoming some sort of domestic goddess. There is aslo the added realisation that no matter how good shop bought products are homemade always, always tastes better.

Notebooks are scattered around my studio space, most have had some kind of use, few have ever been finished.

Macaroni Cheese, hmm, hot fresh with stringy cheese sauce - homemade ofcourse. The thought makes my eyes roll back in my head and I think I'm mentally purring.

Tea - the proper stuff, I freely admit to being a bit of a tea snob. As a result, I try and avoid prepacked teabags unless I made them. Loose leaf is the way. Today I bought some fabulous Gunpowder and Mint at The Tea House in Convent Garden.

TTNF

MagpieSpirit


Tuesday, 24 January 2012

New Year Means Back To School


Now that my knitting and textiles classes have restarted, life has definitely returned to normal, creatively and literally my hands are covered in inks. It’s great not to be a newbie anymore and to return and be familiar with your surroundings, your tutors and the other returning students. One thing that is definitely different about this term is that, I have actually joined the college library and have already borrowed books to research/explore some of the ideas that I have for my possible entry to the college student exhibition for my hand knitted course.
I will update the blog with whatever I eventually entry for the exhibition.

TTFN
 
MagpieSpirit

Friday, 20 January 2012

Carp the Day

Here I go again! Yes 2012 seems to be off at an amazing pace with Valentine's Day just around the corner. This year has all the makings of a very exciting year;

One, it's a leap year and although it is just one extra day I feel that I have been internally woo hooing at the thought,
Two, the Queen's Jubilee which is a fabulous excuse for a ladies day with pretty sandwiches,
Three, the Olympics, and although I do not have tickets for any stadium events but that is what street events are for.

So another reason why I'm feeling the time pressure is due to the fact that I am finally taking the leap and putting some of my creations on sale via Etsy. It's actually quite an exciting time and a little scary. Oh well! Carp the Day and all that!! Keep an eye on Etsy for unique and handmade sewn, knitted or screen printed creations.

As I continue to work on my first collection and new website, I will continue to blog regularly. In fact, blogging at least once a week is one of my New Year's resolutions. You will be hearing a lot more from me.

TTFN,

MagpieSpirit

Tuesday, 17 January 2012

Is it me or is 2012 off to a flying start?


It's already mid-January and I feel like I have hardly taken a breath since New Year's (which I spent in Cape Town, SA).

So with my new tan lines I'm going to dive feet first into creative life, keep an eye out over the next few weeks as I launch my first etsy shop.